Showing posts with label progress. Show all posts

Monday, December 24, 2018

Audio Pi in the field

I put the RPi, battery, mike and android in my bag and took the system into the field for some real world testing.  Using WiFi on the system as an access point with hostapd allowed android to connect to RPi directly, and eliminated the need to use the bluetooth stack on both the RPi and Android.  It's a straightforward setup in alpine linux, with /etc/conf.d/hostapd pointing to /etc/hostapd/hostapd.conf.  That file sets the ssid=audiopi, and /etc/hostapd/hostapd.wpa_psk sets the WPA key.

DHCP is provided for the AP with dhcpd, the file /etc/dhcp/dhcpd.conf has this stanza for the subnet 192.168.4.0.

 subnet 192.168.4.0 netmask 255.255.255.0 {
  option domain-name "audiopi";
 range 192.168.4.10 192.168.4.248;
}

The ArdOsc app is configured to use UDP with the 192.168.4.1 IP address configured in /etc/init.d/setup_hostap.  WiFi range is good enough for local control, and I had no issues with network connectivity or performance.

I pushed the setup_hostap script to my gitlab audiopi repository,
https://gitlab.com/schessman/audiopi

#!/bin/sh
#
# enable cirrus_logic audio
/etc/init.d/audiopi_settings.sh 

# shutdown wlan0 client, switch to hostap
/etc/init.d/wpa_supplicant stop
ifdown wlan0
/etc/init.d/hostapd start
ip addr add 192.168.4.1 dev wlan0
ip route add default dev wlan0

# enable DHCP and access
/etc/init.d/dhcpd start

# conserve power
echo /etc/init.d/usb_power stop

I had good success with recording at a jam session, mic clipped to the bag and placed in the center of the group; and also at a few rehearsals where I clipped the mic to a music stand to bring the vocals to the foreground.  For the best results, taking a stereo line in feed from a mixing board connected to more mikes makes the most sense.  I was satisfied with the results from the Stereo Sony ECMCS3, and burned a couple CDs from the rehearsal sessions.  Ardour is a great tool for mastering, the plugin set is extensive and well worth the effort to make it work.

I also went to a Google Developer Group meetup with the RPi in a pocket and had the only wearable computer (besides all the android phones).   The blinking lights on the RPi combined with the volume bar lights in the ArdOsc app make for a good casual demo.

Next I plan to present this at the Monthly NovaLug meeting on 
Saturday, February 9, 2019.  I'll post the slides from the talk on the gitlab audiopi repository.

Friday, August 10, 2018

Android in Wonderland

Modern software development is a complex task, and having an IDE that guides the developer can make this a bit more directed.  I imported the ardmix github java code into Android Studio 3.2 and converted it to kotlin, just to make life interesting.  The syntax is similar to java, but cleaner, and has a more modern feel.  Android Studio considers this a first class language and I was able to compile and run the app after a bit of tweaking.  I will not miss Java, and suspect Google feels the same.

The source is posted on gitlab ardosc, under the GPL3+ license.  It uses an OSC Library called NetUtil to handle the UDP communication to Ardour.  The java sources for de.sciss.net NetUtil were developed by Hanns Holger Rutz and licensed under LGPL 2.1 or later.  The original sources can be found at https://github.com/Sciss/NetUtil/.

I plan to release this as a free Google Play store app with no strings once I am finished testing, and will be using the app with the RPi3 in the field as part of the tests.  There is more conversion to do from Java idioms to Kotlin, as I begin to be comfortable with the syntax and best practices.  The mechanical conversion compiled and ran but lint finds lots of fluff and I know it can be much cleaner.

Tuesday, May 3, 2016

Ardour and the Pi

I was able to compile (waf) ardour4 on the Raspberry Pi3 and it works fine with the Cirrus Logic Audio Card.  I can record and play back in stereo using the onboard microphones and headphone output.  I will have to try my preamp and AKG condenser microphone and confirm the line in WORKS but I have confidence.

Compiling ardour is not for the fainthearted.  The dependency list is extensive and it took a while on the Pi3 but nothing seemed out of the ordinary for a project of this complexity.

If you are really interested, see http://ardour.org/current_dependencies.html for the dependencies and http://ardour.org/building_linux.html for the procedure.

I had to build a few of the dependencies:
  • atkmm-2.22.7
  • libart_lgpl-2.3.21
  • liblrdf-0.5.0
  • pangomm-2.28.4
 but raspbian has a working jack daemon and it runs fine.
Time to try some plugins and see if the whole system can handle signal processing.

Thanks to all the Ardour and Linux Audio developers who have made this possible!

Thursday, April 7, 2016

Cirrus Logic driver

Building the raspberry pi code is documented at Kernel Building.  I wanted to start with stable linux 4.5 from git.kernel.org because the Cirrus Logic driver is in the mainline starting with v4.5.  But wanting quick results sent me to use a precompiled 4.1.19 kernel from Matthias "Hias" Reichl.
  There are lots of issues with getting the Cirrus Logic Audio Card working.  Hias has a version at RPi Linux driver for Wolfson / Cirrus Logic Audio Card

I used the precompiled version found there.

wget http://www.horus.com/~hias/tmp/cirrus/cirrus-linux-4.1.19.tgz
sudo tar zxf cirrus-linux-4.1.18.tgz -C /

Add the following lines to /boot/config.txt

dtoverlay=rpi-cirrus-wm5102
dtoverlay=i2s-mmap 
 
And add the following lines to /etc/modprobe.d/cirrus.conf

softdep arizona-spi pre: arizona-ldo1 
softdep spi-bcm2708 pre: fixed 
softdep spi-bcm2835 pre: fixed 


Rebooting and note this works.
dmesg | grep arizona
[    7.722414] arizona spi0.1: WM5102 revision C
 

aplay -l
**** List of PLAYBACK Hardware Devices ****
card 0: sndrpiwsp [snd_rpi_wsp], device 0: WM5102 AiFi wm5102-aif1-0 []
  Subdevices: 1/1
  Subdevice #0: subdevice #0
 

Thanks Hias!

Friday, March 18, 2016

lmbench results

I downloaded and ran lmbench on the Raspberry Pi 3, and also on the Pentium III as a comparison.  There is a page with the summary and some graphs.  The one of most interest is the memory read latency benchmark.


LMBench is pretty stale, originally released (pdf) back in 1996, it was quite sophisticated in divining the actual hardware architecture of many diverse processors.  I like the graphs.  They have a solid engineering feel to them to this day.

What I did on the rpi to run this:

mkdir src
cd src
wget http://www.bitmover.com/lmbench/lmbench3.tar.gz
tar zxvf lmbench3.tar.gz
cd lmbench3
mkdir SCCS
touch SCCS/s.ChangeSet
cd src
make results
cd ../results/
sudo echo true > /usr/local/bin/bk
sudo chmod +x /usr/local/bin/bk
mkdir HTML
sudo aptitude install ghostscript netpbm imagemagick
make html


The HTML directory has the summary and some gif files.  I had to edit the Makefile and comment out the gs PS.6, PS.7 and PS.8 lines to get make to run to completion.
Bitrot setting in after 11 years.

-r--r--r-- ob/ob          9474 2005-08-22 20:19 lmbench3/results/Makefile

#gs -sOutputFile=HTML/mem-unscaled%02d.$(IMAGE) -sDEVICE=$(IMAGE) -q -dNOPAUSE PS/PS.6 < /dev/null
#gs -sOutputFile=HTML/bwfile-unscaled%02d.$(IMAGE) -sDEVICE=$(IMAGE) -q -dNOPAUSE PS/PS.7 < /dev/null
#gs -sOutputFile=HTML/bwmem-unscaled%02d.$(IMAGE) -sDEVICE=$(IMAGE) -q -dNOPAUSE PS/PS.8 < /dev/null

Monday, March 14, 2016

Happy Pi Day!

Success in loading NOOBS and Raspbian, no issues and the documentation is fine.
I will begin functional testing of the base system with iozone, confirming that the microsd card is capable of recording audio, and if a USB flash drive has the necessary bandwidth as well.

/proc/cpuinfo shows four identical cores.  Interesting that there is a serial number.

...
processor       : 3
model name      : ARMv7 Processor rev 4 (v7l)
BogoMIPS        : 76.80
Features        : half thumb fastmult vfp edsp neon vfpv3 tls vfpv4 idiva idivt vfpd32 lpae evtstrm crc32
CPU implementer : 0x41
CPU architecture: 7
CPU variant     : 0x0
CPU part        : 0xd03
CPU revision    : 4

Hardware        : BCM2709
Revision        : a02082
Serial          : 00000000f70e895a


apt-get update and apt-get upgrade do the expected, after setting up the WiFi.  All in all this is an easy to use linux system.

I run iozone with this script:

cd /mnt/sda2
/home/pi/src/iozone3_434/src/current/iozone -Rab usb2.0_PNY.xls -i 0 -i 1 -g 1G -+u -f /mnt/sda2/tmp -z> usb2.0_PNY.out
/home/pi/src/iozone3_434/src/current/iozone -Rab SanDisk_SDSQUNC.xls -i 0 -i 1 -g 1G -+u -f /tmp/x -z > SanDisk_SDSQUNC.out


I had to download iozone3_434.tar and compile it, no problems but it is in my wheezy linux repository as iozone3 and I was able to apt-get install iozone3 on a debian system.

This benchmark can produce 3d color graphs of disk performance comparisons, so I will be posting them as I run them. 
  

Saturday, March 12, 2016

Identify and download necessary software resources

I will start with NOOBS and the included Raspbian image to test the Raspberry Pi 3 out of the box.  Once that is working and tested, then build/install a kernel with the Cirrus Logic Audio Card device driver.  There are a number of options to accomplish the driver build/install and I will explore those after the NOOBS/Raspbian install is completed.

NOOBS needs to be copied to the MicroSD card I purchased.  This is not documented well on the RaspberryPi.org site for Linux users so this is what I did.  I found Norman Dunbar's blog entry from 2015/01/11 and used it as a guide for the following.

  • Boot Ubuntu on a Toshiba netbook with SD card slot.
  • Download the desired NOOBS zip file.
root@hoodoo:/tmp# wget https://downloads.raspberrypi.org/NOOBS_latest
root@hoodoo:/tmp# ls NOOBS*
NOOBS_latest

  • Identify SD.  Mine came formatted FAT32 with partition /dev/sdb1. 
root@hoodoo:~# fdisk -l /dev/sdb

Disk /dev/sdb: 31.1 GB, 31104958464 bytes
255 heads, 63 sectors/track, 3781 cylinders, total 60751872 sectors
Units = sectors of 1 * 512 = 512 bytes
Sector size (logical/physical): 512 bytes / 512 bytes
I/O size (minimum/optimal): 512 bytes / 512 bytes
Disk identifier: 0x00000000

   Device Boot      Start         End      Blocks   Id  System
/dev/sdb1            8192    60751871    30371840    c  W95 FAT32 (LBA)
 

  •  Mount the FAT32 partition
root@hoodoo:~# mount /dev/sdb1 /mnt/sd


  • Unzip the NOOBS zip file to the SD card
root@hoodoo:~# cd /mnt/sd
root@hoodoo:~# unzip /tmp/NOOBS_latest
root@hoodoo:/mnt/sd# sync
root@hoodoo:/mnt/sd# cd /
root@hoodoo:/# umount /mnt/sd


The next step will be to boot the Raspberry Pi 3 for the first time and install Raspbian.

Select and acquire necessary initial hardware

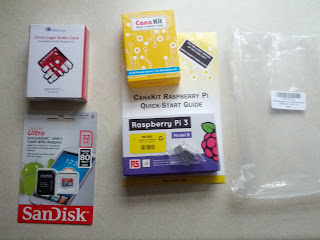
I think Amazon is as reasonable a supplier as any, and so have purchased a Raspberry Pi 3 with power supply and Cirrus Logic Audio Card there.  I also selected a SanDisk Ultra 32GB UHS-I Class 10 MicroSDHC 80mb/s SDSQUNC-032G MicroSD card.  This was selected after checking a list of compatible SD cards and their relative performance.

This is the smallest computer I have ever owned.


Affiliate links to the items I have purchased can be found inline, at the right hand side and the bottom of the page.